Tuesday 4 October 2016

How to Lock and Unlock Your PC With USB Drive

You can Lock and Unlock Your PC With USB Drive in Windows 7. Its a Inbuilt feature in Windows 7 that create USB Flash Drive as a Security Key to Lock and Unlock Windows PC at Startup. When you will enable this feature then Password will store on USB Flash Drive. Now when you will start your PC then it will ask to insert USB Flash Drive to Unlock Computer without Insert USB Flash Drive you PC will not start.
That USB Flash Drive will work on specific Windows on which you have created USB Key. Your USB Flash drive only need at startup after login you can remove USB Drive.

Lock and Unlock Your PC With USB Drive


1. First of All Insert USB Drive on Windows PC then you will have to Change USB Drive Letter A.
2. Now Click on Start Button then Type Run and then Press Enter.
or
Press Windows + R to Open Run Command.
3. Now type Syskey command and then Click on OK.


Lock PC With USB Drive


4. Now Securing the Windows Account Database windows prompt the Select Encryption Enabled Radio button and then Click on Update.


5.  Now Startup key window prompt then Select System Generated Password Radio button and then Select Store Startup Key on Floppy Disk and then Click on OK.


6. Now it will ask to insert USB drive to Save Startup Key then Click on OK Now It will show Startup Key has been saved on USB Drive then again Click on OK. 
7. Now Account Database Startup Key was changed now Click on OK.


Now you Restart you PC then you will see the Windows Startup Key Disk will prompt at Start it require to Insert USB Flash Drive to Login at Startup. 


Unlock PC Not Required USB Drive to Login

1. First of all Follow above Steps 2 to 4. 
2. Now Select System Generated Password Radio Button and then Select Store Startup Key Locally and then Click on OK.


3. Now It will ask to Insert that USB Drive then Click on Ok and Again Click on OK.
Now when you will restart your PC then It will start Normally there is no need to Insert USB Drive at Startup.

To Any Queries Send the Mail Click here..
BY


Wednesday 28 September 2016

Set up & Configure VPN connection in Windows 10/8/7: Screenshot Tutorial

A Virtual Private Network (VPN) is a network that uses the internet to provide remote access to a centralized organizational network. VPN is very useful these days as it allows one to access data, files, printers and other devices remotely. Users need to be authenticated first, to be able to connect a VPN. It is not a cloud service, but a file sharing service that requires the internet and a server to be hosted.

Configure VPN connection

This tutorial will show you how to configure your Windows 10/8/7 computer to accept VPN connections.

Set up a new connection

1. Open Control Panel > Network and Sharing Center.


2. Click on “Change adapter settings”.


 3. Press Alt + F and click on “New Incoming Connection”


4.  Now a wizard will open. In the first step, mark those users whom do you want to allow access to use your connection.


 5. Put a mark on “Through the internet” and click Next.
 6. Now select the protocols you want to connect, and double click on “Internet Protocol Version 4   (TCP/IPv4).


6. In this screen which appears, ensure that the Properties set are the same as shown in the image below. Click OK.


 7. Now you will see the last step of the Wizard. Click on Close to finish it – but remember to note down the computer’s name as it will be used when you connect.


             That’s all! You will have set up your own VPN connection. Now let’s see how to configure the Windows Firewall.

Configure Firewall to accept connections

1. Go to Control Panel > Windows Firewall.

2. Click on “Advanced Settings” in the left menu.


3. Now click on “Inbound Rules”. Next click on the “Actions” menu and then click on “New Rule…”


 4. A Wizard will open. In the first step, select the “Port” option and click on Next.


5. Select “TCP”. In the “Specific remote ports” space, enter “1723” and click on Next.


6. Now select “Allow the connection” and click Next, again.


7. Apply the rule to everyone.


8. In the Name and Description fields, enter anything you want and click on “Finish”


 Now you will have also configured your Windows Firewall to accept connections. But you will also need to configure the Router. I can’t explain all the Router settings, as they differ from Router to Router, but I can help you out by just giving you some advice – and that is to Enable PPTP and Generic Route Encapsulation (GRE) on the Router, or enable PPTP, or create a port forward to port 1723. If your Router has an additional setting for PPTP or VPN, make sure it’s enabled. After doing this, your computer will be ready to receive the VPN connection.


To Any Queries Send the Mail Click here..
BY


Friday 2 September 2016

How to block Adult websites on your Computer

                    How to block websites and why really you need to Know? Well,Blocking any website on your computer becomes necessary when you really want to make it your personal computer. Many times someone from your family or some irritating friend comes to you and want to use your computer to surf internet and then he start viewing videos on youtube or start chatting on Facebook regardless of whether you are liking it or not but you cant even ask them to leave.
                    Of course you never want that anyone use your computer for long time and keep using your internet while you just sit aside them to see what they are doing. You can simply block the sites and prevent them from opening in your system to get rid of this problem.

How to Block Websites on your Computer


There are certain Tricks to block a website from opening on your system :

Method 1 : Using Windows host file

For this method , you don’t require any additional software to be installed on your computer. All you need is a little bit knowledge and some basic file editing capability using notepad. Windows has this host file to map the ip addresses and host names of the host sites to your computer.
By using this trick you can make your computer to redirect again to your local machine instead of opening that host site. So for blocking any website using windows host file you need to follow some steps as given below :
Step 1 :Open  “C:\Windows\System32\drivers\etc” in the Windows search bar or navigate to the folder by clicking your way through Windows Explorer.
Step 2 :Now after reaching to this path you will see a file named Host. Right click on that file and click on open with notepad.
Step 3 :In Notepad, you will see several lines of text used for mapping purposes. Go to the last line of text (it should say something regarding a local host), now press enter to move the cursor to the end of the file then type  “127.0.0.1″  (without codes)and press the spacebar.
Step 4 :Now, type the specified address of the website you wish to block on the same line. For example, type “127.0.0.1 www.reddit.com” , “127.0.0.1 www.facebook.com” to block all these sites.


Step 5 :Now Save this file and ignore if you receive any messages showing  you warning about this modifications.
Step 6 :Go to your browser and verify that the site you want to block isn’t opening anymore.

Method 2 : Using control Panel

If you don’t wish to block sites using this host file or there is some problem in modifying that file , so you can do the same thing using another default function of windows i.e. Control Panel Parental Control.
For doing this , just follow a few steps given below and you are done :
Step 1 :Click on start button  > Go to control panel >  User accounts and Family safety > Set up parental control for any user.


List of all the users in your system will be displayed .
Step 2 :Now select the account for which you want to set the web filter and then under parental controls ,  click ON.
How to block websites
Step 3 :   Click on web filter.
Step 4 : Click on Block some websites or contents .
Step 5  : Click on Edit the allow and block list.
Step 6 : In the Website address box, type the address for the website that you want to allow or block, and then click Allow or Block.

So now you know 2 methods on How to block websites On your Computer easily on Your Computer.

To Any Queries Send the Mail Click here..
BY


Hidden Android Secret Codes that you must know


                   We all know that Android is one of the leading Mobile Operating system. Almost Every House atleast have 1 Android mobile. We all love to Tweak and play tricks with Android Smartphones. Each day we tend to learn More and more about Android Smartphones.
                   The Popularity of Android is just not because it is Owned by Google but also there are Tons of apps available in Google Play Store for almost every task you can think of.
                   You might be Well Versed with Android Operating system but you might not know Some Hidden Android Secret Codes that you used to Explore more about android.
                  Today I will share some Cool Hidden Android Secret Codes that will help you to know more about your Android smartphone and will ease up your Different tasks

Hidden Android Secret Codes

*#*#778O#*#* = Factory Data Reset
*#*#I472365#*#* = Quick GPS Test
*#*#0673#*#* OR *#*#0289#*#*  = Audio Test
*#*#2664#*#* = Touch Screen Test
#’#273283*255*663282*#*#* = Backup Media Files
*#*#0283#*#* = Packet Loopback Test

*2767*3855# = Reinstalls The Phones Firmware & Format Your Phone *#*#232339#*#* OR *#*#526#*#* = WireIess Lan Test
*#*# 1575#*#* = Different GPS Test
*#*#4636#*#*‘ = Complete Information About your Phone
*#*#2663#*#* = Touch Screen Version
*#*#232337#*# = Displays bluetooth Device Address
*#*#4986*2650468#*#* = PDA, Phone. Hardware, RF Call Date
*#*#44336#*#* = Displays Build Time
*#06# = Displays IMEI Number
*#*#8255#*#* = Google Talk Service Monitoring
*#*#I I I I#*#*   |  *‘#*#2222#*#* = FTA Software Version FTA | Hardware \/ersion
*#*#3264#*#* = Rom version
*#*#23233I#‘*#* = bluetooth Test
*#*# 1234#’#’ = PDA and Phone Firmware Info
*#*#0*#*#*= LCD Display Test
*#*#0842#*#* Vibration and Backlight Test
*#*#0588#*#* = Proximity Sensor Test
*#*#232338#*#* = Wi-Fi Mac Address
*#*#7262626#*#*= Field Test
*#*#34971539#*#* = Camera Update
*#*#19732840#*#* = Enable Test Mode
So the Above List Consists of almost 27 Android secret Codes that you might have not known but Since i have shared them here now you are aware of them. So use them whenever you Wish to Check and explore more about your Phone.


To Any Queries Send the Mail Click here..
BY


Tuesday 26 July 2016

Describing various protocols NAT DHCP DNS Proxy Server and TCP IP


To Any Queries Send the Mail Click here..
BY


Network troubleshooting and Testing

To Any Queries Send the Mail Click here..
BY


disk space monitoring script


       Most of the environments (small environments) they are not effort to buy a monitoring tools in this case, scripting will come handy to monitor your environment. I hope this disk space monitoring script will help to monitor the disk space.
#!/bin/bash
# AUTHOR: Ravi Kumar (http://www.arkit.co.in/)
# DATE: 19th December 2015
# Shell script to monitor or watch the low-disk space
# It will send an email to $ADMIN, if the (free available) percentage
# of space is >= 90%
#### Script START here ###
## You can change your threshold value whatever you want ##
THRESHOLD=90
PATHS=/
AWK=/bin/awk
DU=`/usr/bin/du -ks`
GREP=/bin/grep
SED=/bin/sed
CAT=/bin/cat
MAILFILE=/tmp/mailviews$$
MAILER=/bin/mail
## Change ADMIN Mail address as per the requirement ##
mailto=aravikumar48@gmail.com
for path in $PATHS
do
## Validate the Percentage of Disk space ##
DISK_AVAIL=`/bin/df -k / | grep -v Filesystem |awk '{print $5}' |sed 's/%//g'`
if [ $DISK_AVAIL -ge $THRESHOLD ]
then
echo "Please clean up your stuff \n\n" > $MAILFILE
$CAT $MAILFILE | $MAILER -s "Clean up stuff" $mailto
fi
done
## END of the Script ##
        Explanation of script: Above script is written using one FOR loop and one IF condition.
/bin/df -k / | grep -v Filesystem |awk ‘{print $5}’ |sed ‘s/%//g’     <<– This line will calculate the disk space in percentage number
if [ $DISK_AVAIL -ge $THRESHOLD ]   <<– This IF condition will validate the space, which is provided by the above command then number greater then or equal to 90 it will trig an alert using mail command to your given ADMIN address.
To Any Queries Send the Mail Click here..
BY


Tuesday 3 May 2016

Desktop Support Engineer: How to Fix pendrive is not showing in my computer

Desktop Support Engineer: How to Fix pendrive is not showing in my computer:             Sometimes When We Insert Our Pendrive In One Of The Port Of Our CPU.. . Then Pendrive Is Detected By Computer Very Easily But N...

How to fix the usb drive not recoginzed problems in windows

Many Times When We Plug-In Our Pendrive Or Another Removable Media In Our Computer We Get A Annoying Error Message..Which Says That
"USB Device Not Recognized."
I Said This As A Annoying Error Message Because This Error Doesn't Disappear Even If You Insert Your Pendrive In Another Port.


If You Are Facing Usb Device Not Recognize Problem With Any Of Your Plug And Play Device Then Don't Worry Your Device Is Alright There Is A Problem In Your Window With USB DeviceDrivers.

Common Cause Behind This Problem
  • The computer does not support USB 2.0 or USB 3.0
  • Incorrect USB drivers installed on the computer
  • A malfunction in the host controller hardware has occurred
  • Attached devices or hubs may have created the conflict
  • Host controller hardware malfunction
  • Additional system hardware or configurations that may change the timing of the device.
    So Lets Start To Fix Usb Device Not Recognize Error

    STEP 1:Plug-In Your Usb Device In Your Pc.

    STEP 2:Click On Start.

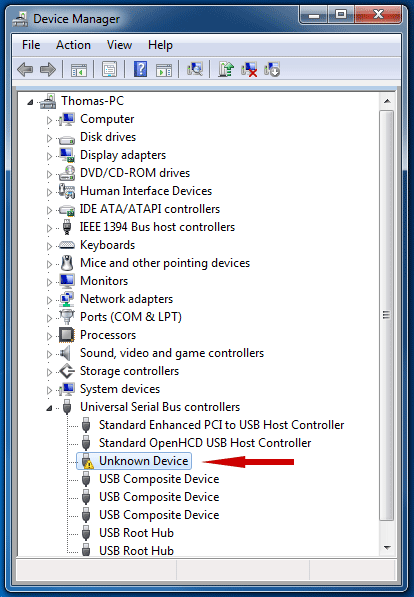
    STEP 3:Click On Run.Then Type devmgmt.msc and Then Press Enter. This Will Open A Device Management Window.

    STEP 4: At Last There Is A Option For "Universal Serial Bus Controllers".Expand That By Clicking (+) button 


    STEP 5
    :After That A List Of USB Controllers Will Appear..

    Check That List Correctly..You Will Find A "Unknown Device"
    Entry Like This.


    STEP 6: Right Click On "Unknown Device" And Click On    Uninstall. This Will Uninstall The Malfunctioned Device Driver.

    STEP 7:After That Right Click On Any Of The Device Driver In List And Click On "Scan For Hardware Changes".This Will Install The New Driver For Your USB Device Or Pendrive Automatically.

STEP 8: Close Device Manager Window And Restart Your Computer. And You Are Done:)

Congrats You Fixed Usb Device Not Recognize Problem..Now YourPendrive Or Other Removable Device Will Work Properly..:)

Enjoy..

To Any Queries Send the Mail Click here..
BY

How to recover deleted data from computer, pendrive or memory cards

Sometimes we face a difficult situation when we accidentally deleted our data from computer,memory cards or pen drives and want to get it back.Many times we are lucky to get back our deleted data from recycle bin but what if the deleted data also not found in recycle bin.


There are lots of freeware and as well as shareware software available in market that claims to recover deleted data from PC, pen drive or even memory cards..Some of them works great and remaining are just scraps.
so today we will concentrate on free data recovery software which actually recovers deleted data from pc.

So First of all how data recovery software works..?
When we delete a file on our computer the first place it goes is to the recycle bin. Emptying the recycle bin doesn’t actually remove it instead of, it only delete a link between our computer file system to deleted file and designates the space that file is using as free space for future use.So,until a new file overwrites that space the original file is present on your hard disk. So The data recovery software only rebuilt the links between deleted data to our computer file system.
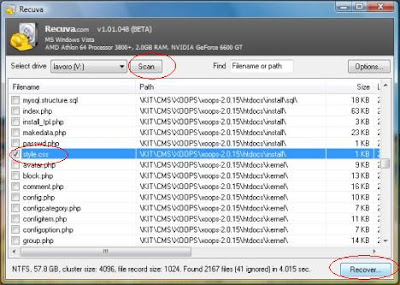
  • Recover Deleted Data using Recuva: I put recuva at top of the list because its my favorite one.Its a handy simple data recovery software by which we can recover deleted files from our PC, pen drives,memory cards and so on.
    Download your free copy of recuva from here
    To recover files  Run the software and select which type of files you want to recover and select particular drive or location and allow it to scan.After scanning it will give you a option to recover all files or selected files from your deleted location.
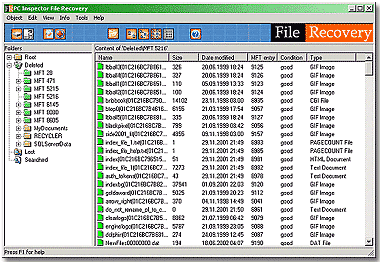
  • Recover Delete Data using PC Inspector File Recovery: PC Inspector File Recovery is also a great software built to recover data from FAT and NTFS file systems.Working of PC Inspector File Recovery and Recuva Is almost same.they both scan for deleted data and give us a option to recover them.
    Download PC File Recovery from here
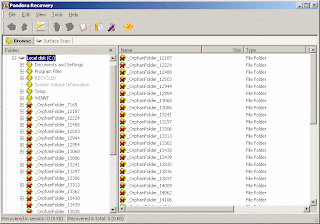
  • Recover Deleted Data using Pandora Recovery: The user interface of Pandora Recovery is about as straightforward.It Supports three kinds of searching modes Browse, Search, and Deep Scan and each has its own description so that you'll know which to choose.
    you can download free copy of this software from here
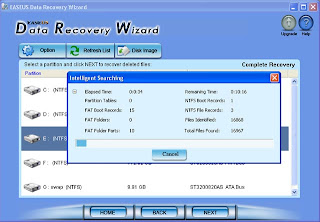
  • Recover Deleted Data using EASEUS: EASEUS is also a Free file recovery software to recover 1 GB files free of charge.It recovers files from formatted partitions with original file names and storage paths.It can also able to Recover files from Linux file system partition under Windows.
    To download EASEUS data Recovery Wizard Click here
  • Recover Deleted Data using Undelete Plus: Undelete plus is also a good file recovery softwareworks on Win 95/98/Me/NT/2000/XP/2003 operating systems.This small software supports all Windows file systems for hard drives and floppy drives including FAT12/16/32,NTFS/NTFS5.
    Download undelete plus from here
.

We tried our best to enlist some of the great data recovery software..So what you think which is the best one among these...
Please leave your valuable comments.. :)

To Any Queries Send the Mail Click here..
BY

How to Close Unwanted ports from your network

As you know i am preparing for CEH (Certified Ethical Hacker) from several months.
Yesterday i found something interesting when reading the topics of Trojans from my CEH study material. Yeah you are right Trojans are backdoor programs that create a connection with the help of open ports many of us are suffering from Trojans.they are one of the dangerous weapon for hackers.

If a hacker install a Trojan on your computer then he can do anything with your computer while sitting to thousands of km far away from your computer.After a successful installation of Trojan hacker can use your computer as a Zombie computer and can do any kind of illegal work with your IP address Or even can able to delete your valuable data.

Today i will show you how to be keep yourself safe by closing open ports.
Ports are the Application specific End points which provide connections in a operating system.
when you are connected to internet each network process use a different port.
for yahoo messenger uses a different port,your browser uses a different port to establish a connection with network.

As we discussed about Trojans earlier,when a hacker installs a Trojan on your computer..he need a open port to create a connection from your computer to his computer.
To keep our self save from this kind of attacks we need to close our open ports.


I searched a lot in my CEH study material on "how to close a open port" but didn't succeed..then after decided to do it myself.

After 4 hours of consistent hard work i found a way by which we can able to close open ports..
To close open Ports..Here's The Procedure..
  1. Go To Start And Then Run.
  2. Type "netsh firewall delete portopening TCP PORTNUMBER" without Quotes and PORTNUMBER is the Number of your port which you want to close.
    if you want to close PORTNUMBER 8080 Then the command to close PORT 8080 is.
    netsh firewall delete portopening TCP 8080.
  3. Now Press enter and Your are done..


I also try to created VB Script and .bat file for both commands.

Vbs Script to close open ports..Just copy and paste below coding to notepad file and save as PortCloser.vbs

set ss = createobject("wscript.shell")
set ws = wscript
dim PORT
PORT = InputBox("Enter the port you wish to close:")
ss.run "netsh.exe"
ws.sleep 1000
ss.sendkeys "firewall delete portopening TCP " & PORT
ss.sendkeys "{enter}"
ws.sleep 500
'ss.sendkeys "exit"
'ss.sendkeys "{enter}"


.BAT Script to close open ports..Just copy and paste below coding to notepad file and save as
PortCloser.bat

@echo off
title Port Closer
echo Port Closer
echo.
set /p port=Type the port number you wish to close here:
netsh firewall delete portopening TCP %port%
msg /w * Port %port% has been closed.
exit


For any Queries regarding this..put your valuable comments..

To Any Queries Send the Mail Click here..
BY

How to run the Android Apps on windows version

Now you can run all of the famous Android Apps on your Windows PC.This is the easiest Tutorial to all those who wants to test the apps without wasting their time.

To run Android applications on windows xp,vista or windows 7,all you need is a small andorid emulator which you have to install on your pc.

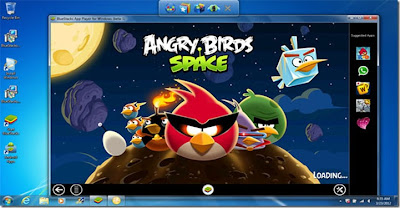
there are lots of android emulator exists in market but we are using one of the well known "Blue stack BETA". the
 earlier version is "Blue Stack Alpha" which is  only compatible with  Windows7PC’s and Windows8Best part of new beta edition is basically converting the ARM compatible Android apps to run on x86 platform and that too with a great efficiency. Or simply it means Now the software is compatible with Vista and windows7 and Windows XP also.In new Blue stack BETA Users can download applications from GetJar, 1Mobile, and Amazon and test them on windows machine. So apps will be downloaded by the software and install with in it.


http://techwarlock.blogspot.in/


You can download Bluestack BETA From Here:cdn.bluestacks.com/bstk-download-success-2.htm

After downloading install this on your windows machine and then signup by using your facebook or bluestack account.
after login download android applications and run them on your windows machine..:)
isn't it easy..try out yourself..and post comments.. :)


To Any Queries Send the Mail Click here..
BY


How to remove write protection on pen drive or memory card

           This Is A Very Common Error Most User Experience When They Want To Modify Or Delete The Contents From Pendrive.Sometimes It Also Comes When We Try To Write  Contents In A Write Protected Pendrive.

         Removing Write Protection From pendrive Is Tough Job,Even We Can't Able To Format A Write Protected Pendrive.If We Do So Then We Will Get A Error Like This.
Saying that  "The Disk Is Write-protected."
"Remove The Write-Protection Or Use Another Disk."


But By Following This Article Can Help You to Remove Write Protection From Pendrives Or Memory Cards :)

So Here The Trick To Remove Write Protection On Pendrive.

STEP 1:First Of All Click On Start.

STEP 2:Click On Run

STEP 3:Type Regedit And Press Enter.This Will Open A Registry Editor

STEP 4: Navigate To 
HKEY_LOCAL_MACHINE\SYSTEM\CurrentControlSet\Control\StorageDevicePolicies

STEP 5:Double click the key WriteProtect in the right pane and set the value Of Value Data Section to 0

As You Can See In Image Below.


TEP 6: Click On Ok.

STEP 7: Exit Registry Editor And Restart Your Computer..


Done..Write Protection Is Removed From Pendrive... :) 

To Any Queries Send the Mail Click here..
BY